
What is the Goal?
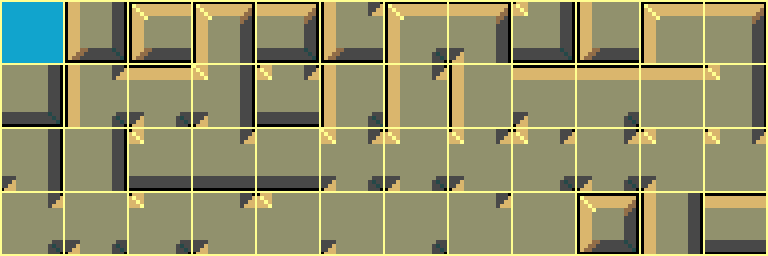
The end result here is to be able to take a grid of what could be a perimeter wall or floor for a game level. However it is to be created in such a way that we can account for every possible connection of either wall, or floor to it’s adjacent counterpart. This is achieved by using the magical 47 tile combinations shown above. With the results of what we can achieve (simple) shown below.
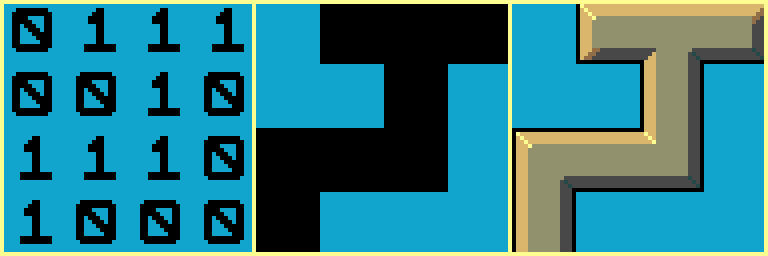
As you can see we are effectively giving the data a true/false or 1/0 value to determine where there is data (1) and the cells which are empty (0). The second image is more of a graphical representation of how this could look before using the autotiling algorithm. Finally the final image depicts the intended results we will achieve.
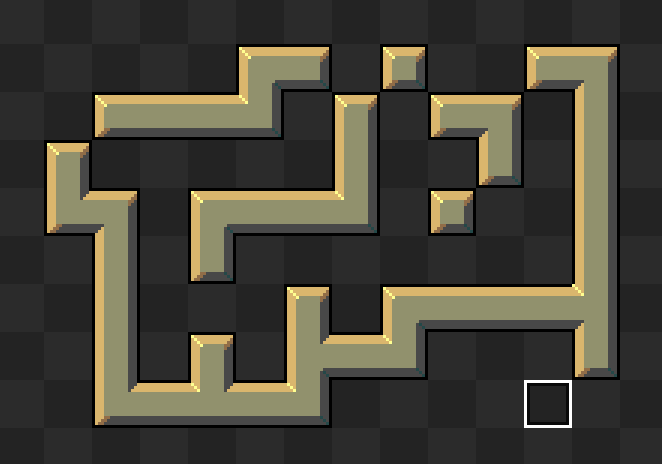
demo available here: https://zingot.serv00.net/autotile
Let’s Begin
I decided to use 16×16 tiles for my autotile 47 tileset. However these can be obviously changed per project. I then created a checkered repeating tile for my background, and a square cursor outline to use as components for my tiny editor. We are now ready to start coding!

Gamemaker Studio has what is known as an ‘event’ system. This is not like Visual Basics event system which effectively performs a ‘wait_event()’ approach to reduce CPU overhead and reacts to window access or keyboard/mouse inputs. Gamemakers event system is a typical game loop. It starts with an object (not in the oriented sense either, don’t ask) the ‘Create’ event which runs only once when an object is initialised is used to define variables for the other event operations. We then have a ‘Step’ event used for logic and user input such as mouse or keyboard operations, and finally a ‘Draw’ event which will render any graphics to the screen.
With all this in mind let’s crack on……
CREATE
/// Autotile Setup

// set font and colour
draw_set_font(fnt_nes);
draw_set_color(c_white);

// mouse x,y grid snapped
mx = 0;
my = 0;

// array grid
gx = 0;
gy = 0;
global.grid_array = 0;

// blank the grid map
for (gy = 0; gy < 13; gy += 1) {
    for (gx = 0; gx < 17; gx += 1) {
        global.grid_array[gx,gy] = 0;
    }
}
Starting off we set the draw colour to ‘white’, with graphics this simply means they are drawn without any tinting to the pixels, whereas if we replaced ‘white’ with ‘red’ the pixels are tinted accordingly. I also set the font to the NES style font, typically used in Arcade machines of yesteryear too.
Next we set up mouse variables and in the ‘Step’ event we will grid snap these mouse co-ordinates to 16 to match our cell size within the tileset. Variables are now defined for the grid dimensions (our screen map) and I set up the array as a global variable (global.grid_array) so it can be accessed outside of this ‘object’. Finally we use a nested loop with ‘gx’ and ‘gy’ to firstly determine the array as 2 dimensional and by setting the values to ‘0’ we are basically blanking the data by using cell zero from our tileset above which as you can see is an empty cell. I have expanded the global.grid_array[gx,gy] by 1 in each dimension to account for ‘out of range’ errors when calling the ‘autotile’ script which checks surrounding array cells.
STEP
/// Check Mouse Input & Perform Autotile Logic

// Grab Mouse X,Y snapped to tile grid
mx = clamp(floor(device_mouse_x(0)/16),0,15);
my = clamp(floor(device_mouse_y(0)/16),0,11);

// Draw Tile
if device_mouse_check_button(0, mb_left) {
    global.grid_array[mx,my] = 45;
    for (gy = 0; gy < 12; gy += 1) {
        for (gx = 0; gx < 16; gx += 1) {
            if (global.grid_array[gx,gy] <> 0) {
                global.grid_array[gx,gy] = autotile(gx,gy);
            }
        }
    }
}

// Erase Tile
if device_mouse_check_button(0, mb_right) {
    global.grid_array[mx,my] = 0;
    for (gy = 0; gy < 12; gy += 1) {
        for (gx = 0; gx < 16; gx += 1) {
            if (global.grid_array[gx,gy] <> 0) {
                global.grid_array[gx,gy] = autotile(gx,gy);
            }
        }
    }
}
This code firstly snaps the mouse positions mx and my to 16 pixel grid positions. This is achieved by combining the floor command to round any divisions down and by using the clamp command to limit the calculated value to a specific range. In this case ‘mx’ is limited to the range 0-15 and ‘my’ to 0-11.
The next code block (Draw Tile) checks for the left mouse button being held down. It then sets the tile at mx,my grid array position to 45. If you look at the tileset you can see this is a solid single tile square (it can be any tile other than 0, but for this example I chose 45). Now we cycle through the grid_array using the nested loops ‘gx’ and ‘gy’ and if the tile found is anything other than 0 we call the ‘autotile’ script and pass the parameters of the current array position.
Equally so the Erase Tile code block simply changes the tile at mx,my grid array position to 0 (blank) and then we proceed to perform the same nested ‘gx’ and ‘gy’ loops calling the autotile script to do its work.
DRAW
/// Render Autotiled Map

// Draw Grid
for (gy = 0; gy < 12; gy += 1) {
    for (gx = 0; gx < 16; gx += 1) {
        draw_sprite(spr_tiles, global.grid_array[gx,gy], gx*16, gy*16);
    }
}

// Draw Cursor
draw_sprite(spr_cursor, 0, mx*16, my*16);
Finally we draw the grid_array to the screen with all of our pre-calulated autotiling cells. The draw_sprite command has 4 parameters. Firstly spr_tiles the full tileset as a single image, second parameter is the 16×16 tile cell within the tileset spr_tiles. Finally we use gx*16, gy*16 to position the tiles correctly on-screen.
The Autotile Script
/// Autotile(tx, ty)

// current tile
tx          = argument0;    // current x tile position in the map
ty          = argument1;    // current y tile position in the map

// surrounding tiles
var tile,w_left,w_right,w_up,w_down,w_upleft,w_downleft,w_upright,w_downright;
tile        = 45;
w_left      = 0;
w_right     = 0;
w_up        = 0;
w_down      = 0;
w_upleft    = 0;
w_downleft  = 0;
w_upright   = 0;
w_downright = 0;

// array boundary checks (determine vars as true/false)
if tx > 0  {if global.grid_array[tx-1,ty]<>0 {w_left = 1;} else {w_left = 0;}}
if tx < 16 {if global.grid_array[tx+1,ty]<>0 {w_right = 1;} else {w_right = 0;}}
if ty > 0  {if global.grid_array[tx,ty-1]<>0 {w_up = 1;} else {w_up = 0;}}
if ty < 12 {if global.grid_array[tx,ty+1]<>0 {w_down = 1;} else {w_down = 0;}}
if (tx > 0) && (ty > 0) {if global.grid_array[tx-1,ty-1]<>0 {w_upleft = 1;} else {w_upleft = 0;}}
if (tx > 0) && (ty < 12) {if global.grid_array[tx-1,ty+1]<>0 {w_downleft = 1;} else {w_downleft = 0;}}
if (tx < 16) && (ty > 0) {if global.grid_array[tx+1,ty-1]<>0 {w_upright = 1;} else {w_upright = 0;}}
if (tx < 16) && (ty < 12) {if global.grid_array[tx+1,ty+1]<>0 {w_downright = 1;} else {w_downright = 0;}}

// dictate the tile to replace at tx,ty position
if(w_up) {
    tile = 1;
    if(w_right) {
        tile = 5;
        if(w_down) {
            tile = 13;
            if(w_left) {
                tile = 29;
                if(w_upright) {
                    tile = 30;
                    if(w_downright) {
                        tile = 34;
                        if(w_downleft) {
                            tile = 40;
                            if(w_upleft) {
                                tile = 44;
                            }
                        }
                        else if(w_upleft) {
                            tile = 41;
                        }
                    }
                    else if(w_downleft) {
                        tile = 38;
                        if(w_upleft) {
                            tile = 42;
                        }
                    }
                    else if(w_upleft) {
                        tile = 37;
                    }
                }
                else if(w_downright) {
                    tile = 31;
                    if(w_downleft) {
                        tile = 35;
                        if(w_upleft) {
                            tile = 43;
                        }
                    }
                    else if(w_upleft) {
                        tile = 39;
                    }
                }
                else if(w_downleft) {
                    tile = 32;
                    if(w_upleft)tile = 36;
                }
                else if(w_upleft) {
                    tile = 33;
                }
            }
            else if(w_upright) {
                tile = 17;
                if(w_downright) {
                    tile = 19;
                }
            }
            else if(w_downright) {
                tile = 18;
            }
        }
        else if(w_left) {
            tile = 16;
            if(w_upright) {
                tile = 26;
                if(w_upleft) {
                    tile = 28;
                }
            }
            else if(w_upleft) {
                tile = 27;
            }
        }
        else if(w_upright) {
            tile = 9;
        }
    }
    else if(w_down) {
        tile = 46;
        if(w_left) {
            tile = 15;
            if(w_downleft) {
                tile = 23;
                if(w_upleft) {
                    tile = 25;
                }
            }
            else if(w_upleft) {
                tile = 24;
            }
        }
    }
    else if(w_left) {
        tile = 8;
        if(w_upleft) {
            tile = 12;
        }
    }
}


else if(w_right) {
    tile = 2;
    if(w_down) {
        tile = 6;
        if(w_left) {
            tile = 14;
            if(w_downright) {
                tile = 20;
                if(w_downleft) {
                    tile = 22;
                }
            }
            else if(w_downleft) {
                tile = 21;
            }
        }
        else if(w_downright) {
            tile = 10;
        }
    }
    else if(w_left) {
        tile = 47;
    }
}


else if(w_down) {
    tile = 3;
    if(w_left) {
        tile = 7;
        if(w_downleft) {
            tile = 11;
        }
    }
}


else if(w_left) {
    tile = 4;
}

return tile;
In this script you can see for the boundary check part of the script I’ve hardcoded the values 16 and 12 which is representative of my map, however you will need to change these to suit your code. Alternatively you should probably make these dynamic to accommodate various map sizes.
Happy Tiling!